Win 7 Front Mic Works Back Mix Jack Won't Work
Z7_3054ICK0KGTE30AQO5O3KA30N0
hp-concentra-wrapper-portlet
![]() Actions
Actions
HP PCs - Resolve Microphone and Audio Line-in Problems (Windows 7)
This document is for HP and Compaq desktop and notebook computers with Windows 7.
Test hardware and connections, update audio drivers, and configure sound settings if you cannot use a microphone or line-in device such as an audio player or a musical instrument.
Step 1: Run the audio recording troubleshooter
Automatically identify and fix audio problems with the Windows troubleshooting tool.
note:As an option for device testing, search Windows for and open Sound recorder. Click Start Recording to create an audio file you can play back to verify functionality.
-
In Windows, search for and open Troubleshooting.
-
Under Hardware and Sound, click Troubleshoot audio recording.

-
Select the device you want to troubleshoot, and then click Next to start the troubleshooter.
-
If a recommended action displays, select Apply this fix, and then test the device.
Step 2: Check microphone or line-in device status
Check the device status and settings, and then test for an audio signal in Windows sound settings.
-
In Windows, search for and open Control Panel.
-
Click Hardware and Sound, and then click Manage audio devices.
-
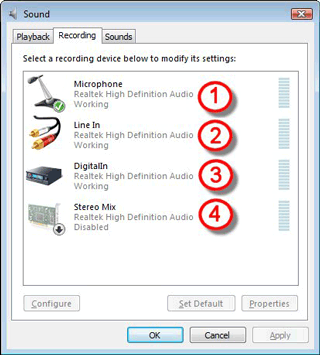
Click the Recording tab and note the status of each device.
note:
Available devices differ depending on the computer model and what is currently connected.
-
Microphone port is working and set as Default
-
Line In device is working
-
Digital In (S/PDIF port) is working
-
Stereo Mix (Software mixer) is disabled

-
If multiple microphones or line-in devices are available, select the device you want to use, and then click Set Default.
-
If the device contains a small circle with an arrow pointing down, the device is disabled. Right-click the device, and then select Enable.
-
-
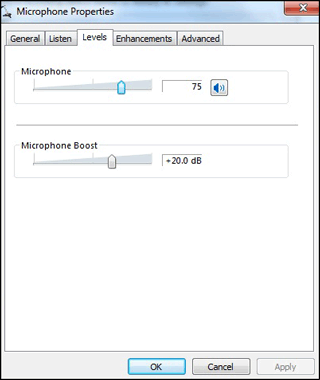
Click the device name, click Properties, and then click the Levels tab.
-
Adjust the level slider to 75.
-
Look for any muted icons
 , and then click the icon to unmute the device.
 -
If Microphone Boost is available, adjust to +20.0 dB, and then click OK.
-
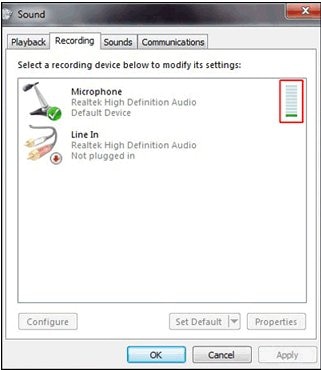
Speak into the microphone or start the line-in audio device, and then view the gray bars next to the device name on the Recording tab.
caution:
To avoid hardware damage when testing a line-in device, start at a low volume and slowly increase it to the desired level. Never turn up volume more than half way to maximum.
-
If the bars change to green, the device is detected but you might need to adjust the playback sound settings. Click the Playback tab, select the device used to hear audio, click Properties, adjust volume and mute settings on the Levels tab, and then test the microphone or line-in device.
-
If the bars remain gray, test the device on another computer or audio device. If this test fails, the device could be damaged or faulty.
-
If the device works with another computer or audio device, continue to the next step.
-
Step 3: Check the device connection
Confirm the correct port is used for the connector type on the microphone or line-in device.
-
Identify the connector type on your microphone or line-in device. Most devices have either a USB connector or a pin connector. There are two types of pin connectors.
-
Four-pin connector: Voice and audio devices such as a headset
-
Three-pin connector: Audio-only devices such as headphones

-
-
Identify the compatible computer port for the device. Look for the following icons or color-coded ports.
-
 Headset port: Many newer computers have one port that supports both three and four-pin connector headsets and headphones.
 -
 Headphone port: Supports headphones only.
 -
 Microphone port: Supports microphones only.
 -
Desktop computer ports: Locate the color coded ports that help identify how to connect the device. Ports and color coding vary by computer model.

Pink (mic) is for microphones.
Blue (in) is for audio input devices such as DVD players, tape players, and musical instruments.
Green (out) is for headphones.
Gray, Black and Orange (side, rear, c/sub) are for speakers.
-
-
Disconnect and reconnect the device to resolve any connection or device detection issues. If you are using a USB device, try a different USB port on the computer and make sure the device driver is installed.
-
Test the device.
Step 4: Check for an updated audio driver
An outdated audio driver can cause sound errors. Check for and install a new driver in Device Manager.
-
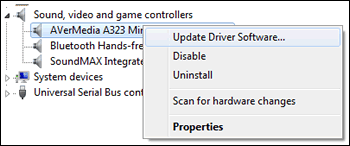
In Windows, search for and open Device Manager.
-
Double-click Sound, video and game controllers.
-
Right-click the audio device, and then select Update Driver Software.
-
Click Search automatically for updated driver software.
-
If an update is available, install it, and then test the device.
-
If an update is not available, continue to the next step.
-
Step 5: Check sound settings in the app or hardware driver where the issue occurs
If the device works in Windows, check audio and voice settings in the app or device driver you are using (such as online meeting apps, games, and webcams). If the microphone or device is configured correctly, check the developer or manufacturer website for app or driver updates.
Win 7 Front Mic Works Back Mix Jack Won't Work
Source: https://support.hp.com/id-en/document/c01926155
Belum ada Komentar untuk "Win 7 Front Mic Works Back Mix Jack Won't Work"
Posting Komentar